
Development
Overview
This section of the book is about your local development environment and the tools that I find most efficient and effective.
Local Drupal site setup
Local development works really well using Docker containers and DDEV. Setting up a local site is a completely painless process on any operating system. After installing Docker and DDEV, follow these steps:
Install Drupal 10
mkdir my-drupal10-site
cd my-drupal10-site
ddev config --project-type=drupal --php-version=8.3 --docroot=web
ddev start
ddev composer create drupal/recommended-project:^10
ddev config --update
ddev composer require drush/drush
ddev drush site:install --account-name=admin --account-pass=admin -y
# Display a one-time link (CTRL/CMD + Click) from the command below to login and edit your admin account details.
ddev drush uli
## Or this will open a browser and you can login with username: `admin` and password: `admin`
ddev launch
More at DDEV CMS Quickstart guides: Drupal installation. And the Local development guide on drupal.org - updated May 2024.
Install Devel module
To generate dummy content and access a host of other useful tools, install the Devel module
ddev composer require drupal/devel --dev
ddev drush en devel devel_generate -y
Read more about Devel generate
Install Drupal Core developer tools
To install the core dev tools, use the following command:
ddev composer require drupal/core-dev --devThe drupal/core-dev package includes various tools and libraries intended for development.
Using composer show drupal/core-dev --all you can see the contents of the package. It should generate something like:
behat/mink ^1.10
behat/mink-browserkit-driver ^2.1
behat/mink-selenium2-driver ^1.4
colinodell/psr-testlogger ^1.2
composer/composer ^2.7
drupal/coder ^8.3.10
instaclick/php-webdriver ^1.4.1
justinrainbow/json-schema ^5.2
mglaman/phpstan-drupal ^1.2.1
micheh/phpcs-gitlab ^1.1
mikey179/vfsstream ^1.6.11
open-telemetry/exporter-otlp ^1
open-telemetry/sdk ^1
php-http/guzzle7-adapter ^1.0
phpspec/prophecy-phpunit ^2
phpstan/extension-installer ^1.1
phpstan/phpstan ^1.10.47
phpstan/phpstan-phpunit ^1.3.11
phpunit/phpunit ^9.6.13
symfony/browser-kit ^6.4
symfony/css-selector ^6.4
symfony/dom-crawler ^6.4
symfony/error-handler ^6.4
symfony/lock ^6.4
symfony/phpunit-bridge ^6.4
symfony/var-dumper ^6.4
Install Admin Toolbar Module & Module Filter
Every site needs Admin toolbar module and Module filter module
ddev composer require drupal/admin_toolbar drupal/module_filter
ddev drush en admin_toolbar module_filter admin_toolbar_tools -y
Install drushonhost
I also like to immediately install the drushonhost addon:
ddev get rfay/ddev-drushonhostRead more about global drush and drushonhost
Edit the web/sites/default/settings.php so settings.local.php loads before settings.ddev.php (the order is critical). You will need to uncomment the lines that load the settings.local.php:
if (file_exists($app_root . '/' . $site_path . '/settings.local.php')) {
  include $app_root . '/' . $site_path . '/settings.local.php';
}

// Automatically generated include for settings managed by ddev.
$ddev_settings = dirname(__FILE__) . '/settings.ddev.php';
if (getenv('IS_DDEV_PROJECT') == 'true' && is_readable($ddev_settings)) {
  require $ddev_settings;
}
Setup settings.local.php
Copy the sites/example.settings.local.php to sites/default/settings.local.php with
cp web/sites/example.settings.local.php web/sites/default/settings.local.phpAdd the line below to include the IS_DDEV_PROJECT environment variable as the last line of your settings.local.php:
putenv("IS_DDEV_PROJECT=true");After a ddev drush cr and perhaps a ddev reload you should be able to run drush on the host. e.g. drush cst.
Set config sync directory
Make the config sync dir with:
mkdir -p config/syncAnd add it to your sites/default/settings.php. Here is the section in that file:
/**
 * Location of the site configuration files.
 *
 * The $settings['config_sync_directory'] specifies the location of file system
 * directory used for syncing configuration data. On install, the directory is
 * created. This is used for configuration imports.
 *
 * The default location for this directory is inside a randomly-named
 * directory in the public files path. The setting below allows you to set
 * its location.
 */
# $settings['config_sync_directory'] = '/directory/outside/webroot';
$settings['config_sync_directory'] = '../config/sync';
Some optional steps
Make a local backup of your database with:
ddev export-db -f dbdump1.sql.gzExport your config with:
ddev drush cexAdd a .gitignore file with:
/vendor/
/web/core/
/web/modules/contrib/
/web/themes/contrib/
/web/profiles/contrib/
/web/libraries/
/web/sites/development.services.yml
/web/sites/example.settings.local.php
/web/sites/example.sites.php
/web/sites/default/default.services.yml
/web/sites/default/default.settings.php

# Ignore default README files
/web/README.txt
/web/README.md
/web/modules/README.txt
/web/profiles/README.txt
/web/sites/README.txt
/web/themes/README.txt

# Ignore paths that contain user-generated content.
/web/sites/*/files
/web/sites/*/private

# local settings file
/web/sites/*/settings.local.php
Add a README.md in the root of your project with a description of your project.
Create your repo on Github (or Gitlab) and add your site to git with:
git init
git add .
git commit -m "first commit"
git branch -M main
# Use your own repo here
git remote add origin git@github.com:hotshotcoderdude/ddev102.git
git push -u origin main
Rock n Roll!!!
Drupal Starter Project
I have created the drupalstarter project on github which already has completed these steps, so you can clone that and start from there.
git clone git@github.com:selwynpolit/drupalstarter.git my-drupal-site
cd my-drupal-site
ddev start
ddev drush site:install --account-name=admin --account-pass=admin -y
# setup settings.local.php as above
# setup your config sync directory
ddev cim -y
Checking Your Permissions
During the wizard installation, or when your welcome page first loads, you might see a warning about the permissions settings on your /sites/web/default directory and one file inside that directory: settings.php.
After the installation script runs, Drupal will try to set the web/sites/default directory permissions to read and execute for all groups: this is a 555 permissions setting. It will also attempt to set permissions for default/settings.php to read-only, or 444. If you encounter this warning, run these two chmod commands from your project's root directory. Failure to do so poses a security risk:
chmod 555 web/sites/defaultchmod 444 web/sites/default/settings.phpTo verify that you have the correct permissions, run this ls command with the a, l, h, and d switches and check that your permissions match the following output:
$ ls -alhd web/sites/default web/sites/default/settings.php

dr-xr-xr-x 8 sammy staff 256 Jul 21 12:56 web/sites/default
-r--r--r-- 1 sammy staff 249 Jul 21 12:12 web/sites/default/settings.php
You are now ready to develop a Drupal website on your local machine.
Converting existing site (non-composer based) to use composer
here are some resources if you find yourself in this unfortunate situation: Taking an existing Drupal application that is not managed with Composer and beginning to manage it with Composer can be a little tricky. Check out this tutorial on how to use Composer with Your Drupal Project from Drupalize.me - Updated August 2023. Also this Composerize Drupal github repo - June 2022 may be useful.
DDEV
For local Docker container development on any platform, there is no better tool than DDEV. This is a well-documented, well-supported tool by the Amazing Randy Fay. You can get help from him or some of the other friendly folks on Discord almost instantly.
From the docs:
Lots of built-in help: ddev help and ddev help <command>. You'll find examples and explanations.
DDEV Stack Overflow for support and frequently asked questions. We respond quite quickly here and the results provide quite a library of user-curated solutions.
DDEV issue queue for bugs and feature requests
Interactive community support on Discord for everybody, plus sub-channels for CMS-specific questions and answers.
ddev-contrib repo provides a number of vetted user-contributed recipes for extending and using DDEV. Your contributions are welcome.
awesome-ddev repo has loads of external resources, blog posts, recipes, screencasts, and the like. Your contributions are welcome.
Twitter with tag #ddev will get to us, but it's not as good for interactive support, but we'll answer anywhere.
Local config - your .ddev/config.local.yaml
From https://ddev.readthedocs.io/en/stable/users/extend/config_yaml
You can override the config.yaml with extra files named
config.*.yaml\. For example, use.ddev/config.local.yamlfor configuration that is specific to one environment, and that is not intended to be checked into the team's default config.yaml.Additionally, you could add a
.ddev/config.selwyn.yamlfor Selwyn-specific values. I like to set the timezone and the router port in case some of my coworkers use an alternate port:
router_http_port: "80"
router_https_port: "443"
timezone: America/Chicago
Use ddev start (or ddev restart) after making changes to get the changes to take effect.
In the endless quest for speed in local development, DDEV uses Mutagen on MAC OS. Apparently the WSL2 setup on Windows 10/11 is the fastest performer for DDEV at the time of this writing.
Fish shell in DDEV containers
This is a real productivity enhancement. When you use ddev ssh you get the old boring bash shell. For a cooler more whizbang fish shell, which will delight you with features like tab completions and syntax highlighting that just work, with nothing new to learn or configure, use the following:
In your .ddev/config.yaml add the following line:
webimage_extra_packages: [fish]In your .ddev/homeadditions/.profile add this:
# if running bash
if [ -n "$BASH_VERSION" ]; then
    # include .bashrc if it exists
    if [ -f "$HOME/.bashrc" ]; then
	. "$HOME/.bashrc"
    fi
fi

# set PATH so it includes user's private bin if it exists
if [ -d "$HOME/bin" ] ; then
    PATH="$HOME/bin:$PATH"
fi
fish
Now ddev ssh will load fish automagically
ddev ssh
Welcome to fish, the friendly interactive shell
Type `help` for instructions on how to use fish
spolit@ddev101-web /v/w/html (main)>
If you don't see fish loading, you can confirm that the .profile file successfully made it to the containers by ssh'ing into the container and cat'ing and file'ing the file. file should return ASCII text and cat should display clear text with no strange codes. See below for details. If you don't see clear text, try using a different editor to recreate the file:
ddev ssh
spolit@tea-web:/var/www/html$ cat ~/.profile
# ~/.profile: executed by the command interpreter for login shells.
# This file is not read by bash(1), if ~/.bash_profile or ~/.bash_login
# exists.
# see /usr/share/doc/bash/examples/startup-files for examples.
# the files are located in the bash-doc package.

# the default umask is set in /etc/profile; for setting the umask
# for ssh logins, install and configure the libpam-umask package.
#umask 022

# if running bash
if [ -n "$BASH_VERSION" ]; then
    # include .bashrc if it exists
    if [ -f "$HOME/.bashrc" ]; then
	. "$HOME/.bashrc"
    fi
fi

# set PATH so it includes user's private bin if it exists
if [ -d "$HOME/bin" ] ; then
    PATH="$HOME/bin:$PATH"
fi


spolit@tea-web:/var/www/html$ file ~/.profile
/home/spolit/.profile: ASCII text
Note
You can also create a global .profile file to run in all containers at ~/.ddev/homeadditions. This doesn't apply to loading fish in all containers as there is not currently a facility to handle global webimage_extra_packages.
setup aliases in ddev
I love short linux aliases like ll (or just l) for listing files. If you spend time poking around the file system in your containers this makes life so much better. A cool new feature since Ddev v15.1 lets you add aliases using this technique
Use ddev ssh to "ssh" into the container and then type ll to list the files in a directory.
Either copy .ddev/homeadditions/bash_aliases.example to .ddev/homeadditions/bash_aliases and add them there!
OR
Create a file .ddev/homeadditions/.bash_aliases with these contents: note. those are the letter L lower case (as in lima).
alias ll="ls -lhAp"
alias l="ls -lhAp"
Note. don't use .homeadditions - use the homeadditions with no period (or full stop) in front.
Upgrading DDEV
After you install a new version of ddev, run ddev stop and then ddev config to reconfigure things for your project. Just press enter for all the questions. It keeps things rolling smoothly. Run ddev start to start it all back up again.
brew upgrade ddevShow others your ddev local site using ngrok
Email Capture and Review
Mailpit (which replaced MailHog) is a mail catcher which is configured to capture and display emails sent in the development environment.
After your project is started, access the Mailpit web interface at http://mysite.ddev.site:8026 or use ddev launch -m to launch Mailpit.
Mailpit will not intercept emails if your application is configured to use SMTP or a third-party ESP integration.
If you’re using SMTP for outgoing mail—with Symfony Mailer or SMTP modules, for example—update your application’s SMTP server configuration to use localhost and Mailpit’s port 1025.
DDEV and Xdebug
This is a magical match made in heaven. To enable or disable Xdebug use
$ ddev xdebug on
and
$ ddev xdebug off
Note. This will slow everything down because xdebug has a significant performance impact so be sure to disable it when you are finished with your debugging session.
In phpstorm, you can uncheck the following settings:
- force break at first line when no path mapping is specified
- force break at first line when a script is outside the project
Note. we usually use port 9000 for xdebug look in .ddev/php/xdebug_report_port.ini for the real port settings. Recently for a project I found it set to 11011
The contents of the file are:
[PHP]
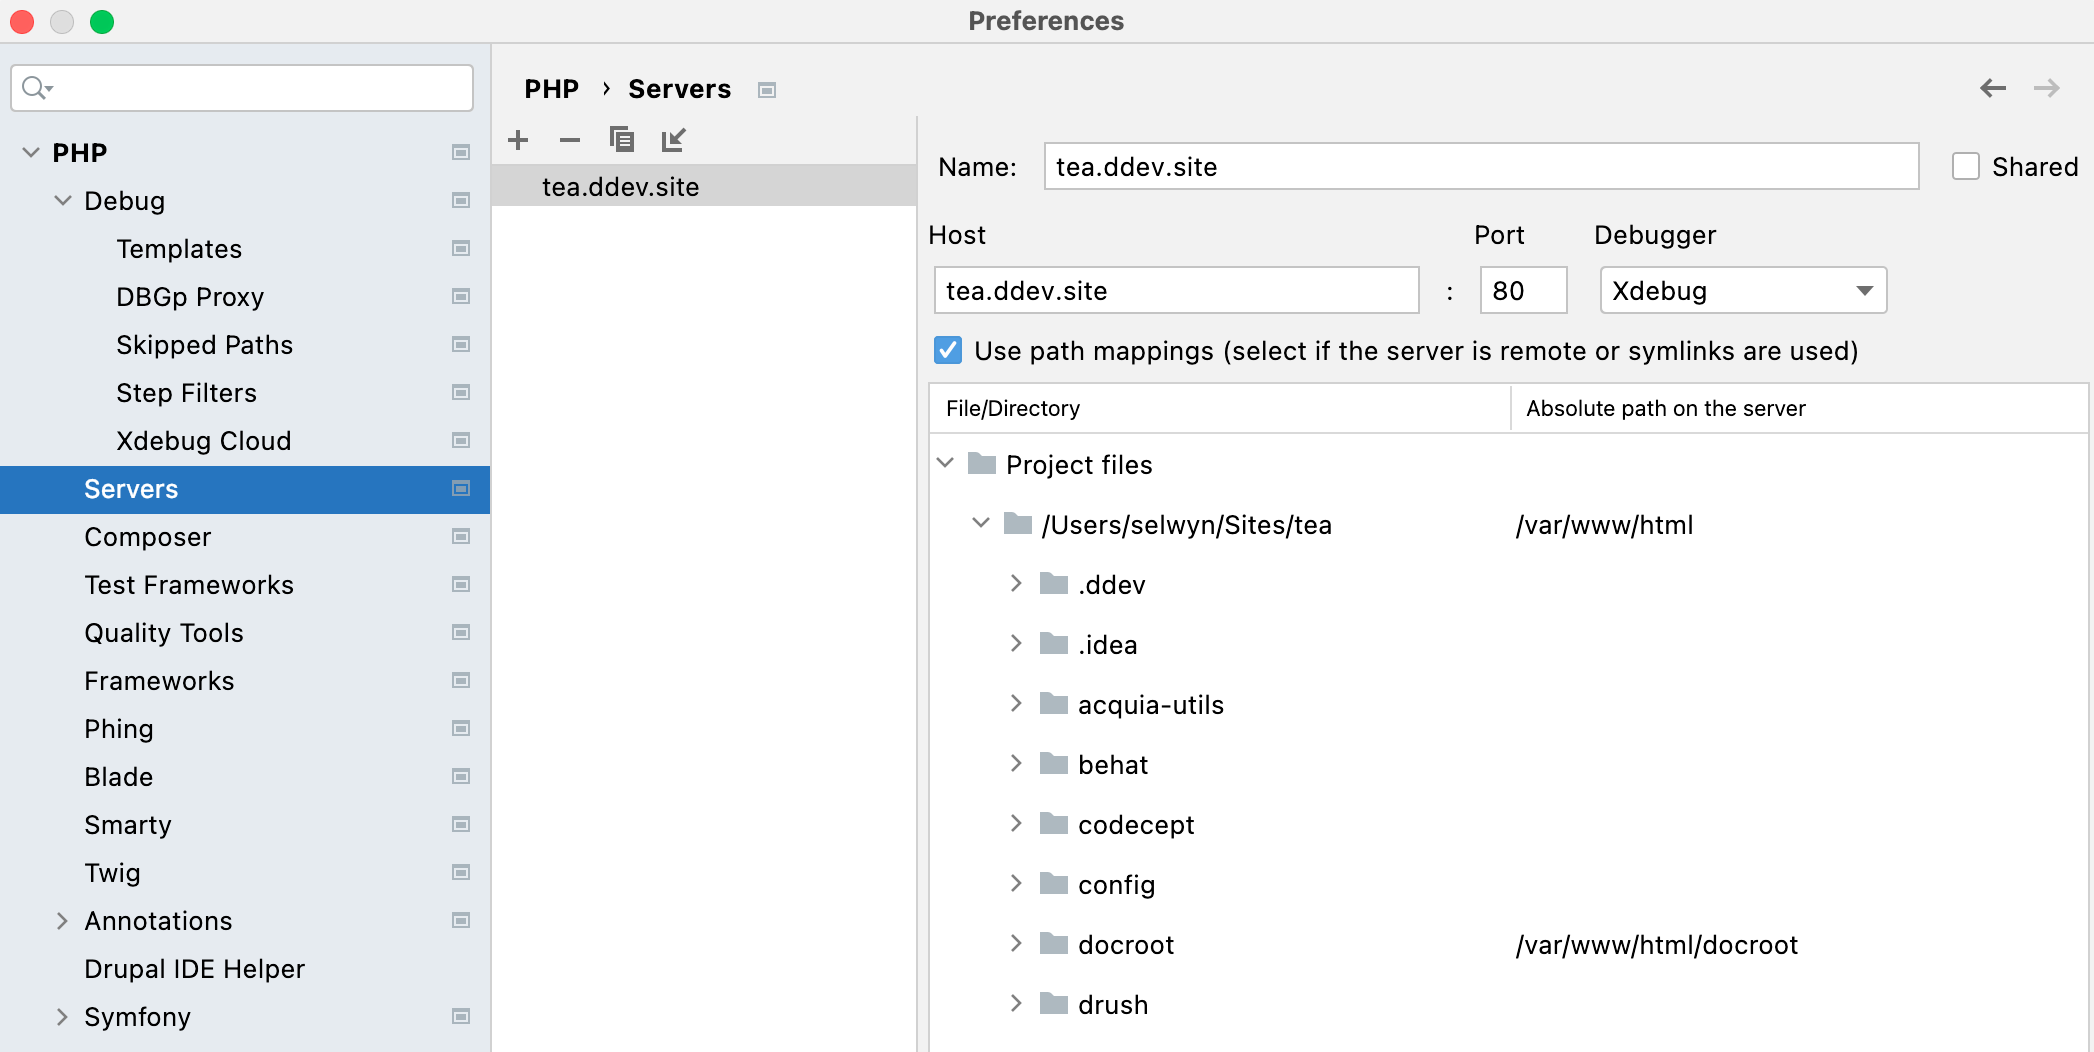
xdebug.remote_port=11011For phpstorm, if you start listening for a debug connection, it should automatically try to create a debug server config for you. If it doesn't manually create one using the following values:
e.g
- name: tea.ddev.site
- host tea.ddev.site
- port: 80
- debugger: xdebug
- check use path mappings
- for docroot specify: /var/www/html/docroot (i.e. wherever index.php is)
Command line or drush debugging
For command line or drush debugging (xdebug, phpstorm)
ddev sshexport PHP_IDE_CONFIG=\"serverName=d8git.ddev.site\"or
export PHP_IDE_CONFIG=\"serverName=inside-mathematics.ddev.site\"confirm debug is turned on
php -i | grep debugYou should see:
xdebug support => enabledAlso you can confirm the port
set a server in phpstorm that matches the name d8git.ddev.site or inside-mathematics.ddev.site.
Configure the server to use path mappings
/Users/selwyn/Sites/ddev 82 ---> /var/www/html
click listen for debug connections button
set breakpoint and run
replace d8git.ddev.site with the name of your project
Note
You must execute drush from the vendor dir or you will always be ignored like this:
../vendor/drush/drush/drush fixmatIf it doesn't seem to work, try enable Break at first line in PHP scripts - it will usually stop there.
Use drush commands in your shell with DDEV
If you do local development, you can use syntax like ddev drush cst to execute drush commands in the container. This is slower than running on your native system because they are executed in the container but I prefer using drush directly on the host computer as I get to the benefits of Oh My Zsh.
To do this install PHP as well drush globally. Then following the steps to install drushonhost. Once these are working, you can cd into the project directory and issue commands like drush cr, drush cst or drush cim -y etc. It is so very quick and smooth. (Note. this is the case with MacOS and Linux and I suspect it should work fine on WSL2 on Windows.)
Download a Drupal database and load it locally
You can download a Drupal database using drush sql-dump and then import it into the local site with the sequence of commands listed below. Using drush aliases with a site called abc where you want to import the prod (production) database:
drush @abc.prod sql-dump >dbprod.sql
gzip dbprod.sql
ddev import-db --src=dbprod.sql.gz
This works with any site where you've set up your drush aliases including Acquia.
Note
If you see the following error: mysqldump: Error: 'Access denied; you need (at least one of) the PROCESS privilege(s) for this operation' when trying to dump tablespaces you can rather use:
drush @abc.prod sql-dump --extra-dump=--no-tablespaces > dbprod.sql
Cleanup some disk space
Free up disk space used by previous docker image versions. This does no harm.
ddev delete imagesalso
docker system pruneand
docker image prune -aList all docker volumes
docker volume lsRead more about DDEV General cleanup
Accessing specific containers
To ssh into a specific service e.g. from a docker-composer.chromedriver.yml the service is listed under "services:" like:
services:
  chromedriver
Use
ddev ssh -s chromedriver
or for selenium, use:
ddev ssh -s selenium
DDEV Troubleshooting
Why is DDEV doing strange things?
You can find out what it’s doing, use DDEV_DEBUG=true ddev start or even DDEV_VERBOSE=true ddev start. This will display all sorts of debug or verbose information which might give you more information on problems.
Running out of docker disk space
if ddev won't start and shows:
Creating ddev-router ... done
Failed to start ddev82: db container failed: log=, err=container exited, please use 'ddev logs -s db` to find out why it failed
Looking in the log, you might see:
preallocating 12582912 bytes for file ./ibtmp1 failed with error 28
2020-03-16 14:27:54 140144158233920 [ERROR] InnoDB: Could not set the file size of './ibtmp1'. Probably out of disk space
That is the clue.
You can kill off images using
ddev delete imagesor the more drastic
docker rmi -f $(docker images -q)Q. Deleting the images: Does that mean it will delete the db snapshots? A. No, docker images are the versioned images that come from dockerhub, they're are always replaceable. Absolutely nothing you do with ddev will delete your snapshots - you have to remove them manually. They're stored in .ddev/db_snapshots on the host (under each project)
also
docker system pruneand this command prunes every single thing, destroys all ddev databases and your composer cache.
docker system prune --volumesDDEV won't start
ddev pull or ddev start failed with error something like:
Pull failed: db container failed: log=, err=health check timed out: labels map[com.ddev.site-name:inside-mathematics com.docker.compose.service:db] timed out without becoming healthy, status=Or like this:
$ ddev start
Starting inside-mathematics...
Pushing mkcert rootca certs to ddev-global-cache
Pushed mkcert rootca certs to ddev-global-cache
Creating ddev-inside-mathematics-db ... done
Creating ddev-inside-mathematics-dba ... done
Creating ddev-inside-mathematics-web ... done

Creating ddev-router ... done

Failed to start inside-mathematics: db container failed: log=, err=health check timed out: labels map[com.ddev.site-name:inside-mathematics com.docker.compose.service:db] timed out without becoming healthy, status=
This is almost always caused by a corrupted database, most often in a larger database. Since v0.17.0, this is generally only caused by docker being shut down in an ungraceful way. Unfortunately, both Docker for Windows and Docker for Mac shut down without notifying the container during upgrade, with a manual Docker exit, or at system shutdown. It can be avoided by stopping or removing your projects before letting Docker exit.
To fix, ddev remove --remove-data, then ddev start. This may fail and suggest this bazooka version:
ddev stop --remove-data --omit-snapshotPHPStorm and Drupal
Read all about PHPStorm's support for Drupal. This covers:
- Associating Drupal-specific files with the PHP file type
- Using Drupal hooks in PhpStorm
- Setting up Drupal code style in a PhpStorm project
- Checking code against the Drupal coding standards
- Viewing the Drupal API documentation from PhpStorm
- Using the Drush command line tool from PhpStorm
- Using Drupal 8 with Symfony
Read about setting up PHPStorm and Drupal on drupal.org - updated August 2023
PHPStorm and Xdebug
Debugging drush commands at https://www.jetbrains.com/help/phpstorm/drupal-support.html#debugging-drush-commands
PHPStorm has a series of instructions for configuring PHPStorm with Xdebug but unfortunately, nothing specifically on using it with DDEV. Fortunately it doesn't require any special setup for it to work.
Some settings I use

And for this project
If phpstorm doesn't stop when you set a breakpoint on some code, try deleting the server from the config debug, php, servers.
Make sure PHPStorm is listening by clicking the listen button
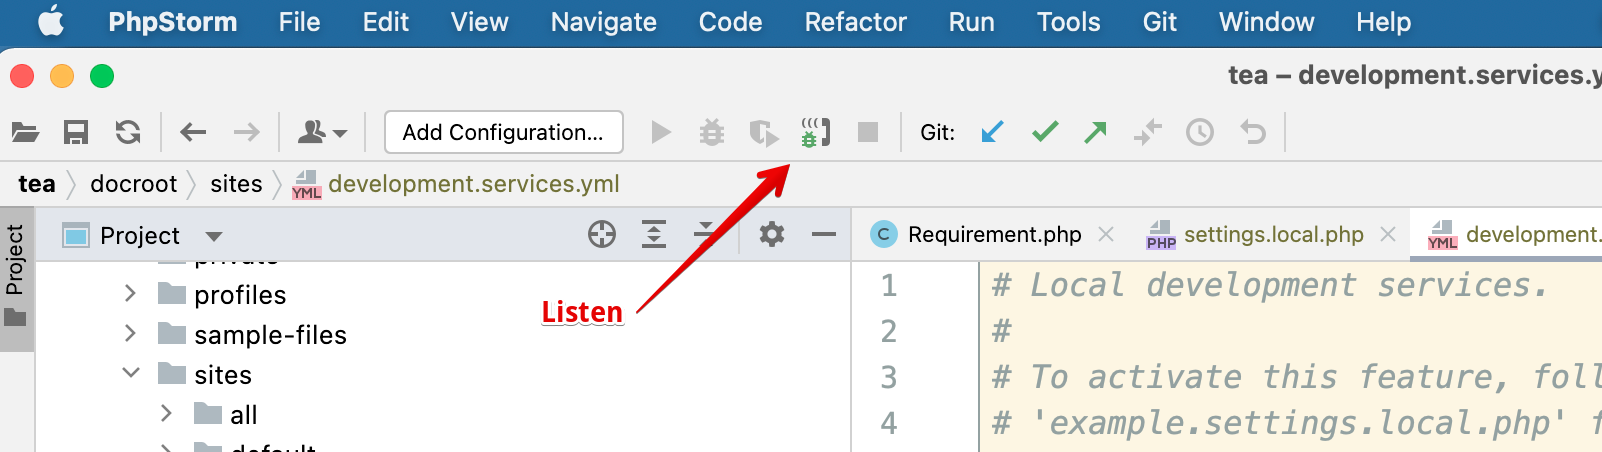
When you try again it will be recreated but you will probably need to specify the path (from the image above).
add a breakpoint in code
You can click on the line number or add the following in code:
xdebug_break()Collecting PhpStorm debugging logs
In the Settings/Preferences dialog (⌘ ,) , go to PHP.
From the PHP executable list, choose the relevant PHP interpreter and click next to it. In the CLI Interpreters dialog that opens, click the Open in Editor link next to the Configuration file: <path to php.ini> file. Close all the dialogs and switch to the tab where the php.ini file is opened.
In the php.ini, enable Xdebug logging by adding the following line:
For Xdebug 3xdebug.log="path_to_log/xdebug.log"The log file contains the raw communication between PhpStorm and Xdebug as well as any warnings or errors:
Code Sniffing
You can set up PhpStorm to automatically look at your code and warn you of lines that do not meet Drupal Coding Standards.
Best practice is to install the Drupal dev tools (with composer require --dev drupal/core-dev) which include the coder module. See How to implement Drupal Coding standards at drupalize.me for details on how to install and configure it.
Go to: Settings, PHP, Quality Tools, PHP_CodeSniffer
Use the following settings:
- ON
- Configuration: System PHP
- Check files with extensions: php, js, css, inc, module
- Check the Installed standards path option and set that to the path to the coder module in your project. e.g.
/Users/spolit/Sites/tea/vendor/drupal/coder/coder_sniffer. You may have to do this twice. - Coding standard: Drupal. Nnote this may not be an option at this time so follow the next steps below and come back to this.
Click the the ... button on this page. This will display the PHP_CodeSniffer dialog. Set the PHP_CodeSniffer path to :/Users/spolit/Sites/tea/vendor/bin/phpcs if you have the core-dev tools installed in your project. At this time you can also set the Path to phpcbf to /Users/spolit/Sites/tea/vendor/bin/phpcbf if you want to use the code beautifier and fixer.
Use /Users/spolit/.composer/vendor/bin/phpcs and /Users/spolit/.composer/vendor/bin/phpcf respectively if you have installed phpcs globally.
Next, you will need to click Apply and then OK. You can now run the code sniffer by right-clicking on a file or directory and selecting Run Inspection by PHP_CodeSniffer from the context menu.
If you are still not presented with the option to Select the Drupal coding standard, click apply and OK and then go back into the settings, PHP, Quality Tools, PHP_CodeSniffer and you should see the option to select the Drupal coding standard. (PHPStorm will kindly notify you that the list of coding standards has been updated.)
Then, if you try to edit a line of code and say, add a trailing space, the line of code will get highlighted. Hovering over the line of code will show you "PHPCS: Whitespace found at end of line." If instead you see a dialog box that says "phpcs: ERROR: Referenced sniff "SlevomatCodingStandard.ControlStructures.RequireNullCoalesceOperator" does not exist then go back to the settings, PHP, Quality Tools, PHP_CodeSniffer and uncheck the installed standards path. Luckily this still allows the Coding standard: Drupal to be selected. Now you should be able to edit a line, wait a moment and PHPStorm will highlight the line and you can see what Codesniffer is unhappy about.
Note
Replace /Users/spolit with your own path to your username and Sites/tea with the name of your project.
More at
SlevoMat Coding Standards Error
If PhpStorm displays boxes complaining about:
phpcs: ERROR: Referenced sniff "SlevomatCodingStandard.ControlStructures.RequireNullCoalesceOperator" does not exist
Run "phpcs --help" for usage information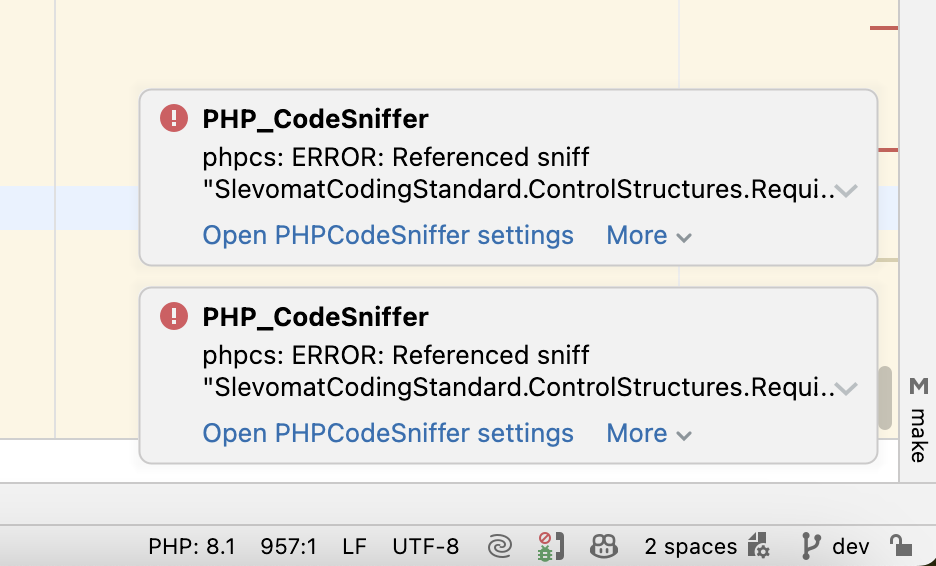
The solution is to open Settings, PHP, Quality Tools, PHP_CodeSniffer and uncheck the installed standards path. Luckily this still allows the Coding standard: Drupal to be selected. Now you should be able to edit a line, wait a moment and PHPStorm will highlight the line and you can see what Codesniffer is unhappy about.
PHPStan static code analysis
Installing PHPStan
composer require --dev phpstan/phpstan phpstan/extension-installer mglaman/phpstan-drupal phpstan/phpstan-deprecation-rulesCreate a phpstan.neon in the root of the project. This one includes the editorUrl so you can click on links in the terminal to open PHPStorm at your line of code. It also includes a line to exclude the Unsafe usage message that is common in Drupal code. See Phil Norton's article Running PHPStan On Drupal Custom Modules - July 2022 for more.
parameters:
    level: 0
    paths:
        - web/modules/custom
    editorUrl: 'phpstorm://open?file=%%file%%&line=%%line%%'
    ignoreErrors:
        - '#Unsafe usage of new static\(\)#'
PHPStan has a number of levels that dictate what sort of things it will look for. Level 0, being the lowest level, looks for some basic checks like variables not being assigned and unknown classes being used. You can find the full description of the different levels on the PHPStan website.
0 - basic checks, unknown classes, unknown functions, unknown methods called on $this, wrong number of arguments passed to those methods and functions, always undefined variables 1 - possibly undefined variables, unknown magic methods and properties on classes with __call and __get 2 - unknown methods checked on all expressions (not just $this), validating PHPDocs 3 - return types, types assigned to properties 4 - basic dead code checking - always false instanceof and other type checks, dead else branches, unreachable code after return; etc. 5 - checking types of arguments passed to methods and functions 6 - report missing typehints 7 - report partially wrong union types - if you call a method that only exists on some types in a union type, level 7 starts to report that; other possibly incorrect situations 8 - report calling methods and accessing properties on nullable types 9 - be strict about the mixed type - the only allowed operation you can do with it is to pass it to another mixed
Running PHPStan
vendor/bin/phpstan analyze will run against any files in the paths specified in the phpstan.neon file.
You can override those with command line options like: vendor/bin/phpstan analyze --level 2 web/modules/custom/general/src/controller
You can also run it against a specific file like: vendor/bin/phpstan analyze --level 6 web/modules/custom/general/src/controller/GeneralController.php
Here is a sample of the output:
vendor/bin/phpstan analyze --level 6 web/modules/custom/general/src/controller/GeneralController.php
Note: Using configuration file /Users/selwyn/Sites/d9book2/phpstan.neon.
 1/1 [▓▓▓▓▓▓▓▓▓▓▓▓▓▓▓▓▓▓▓▓▓▓▓▓▓▓▓▓] 100%

 ------ -----------------------------------------------------------------------------------------------------------
  Line   GeneralController.php
 ------ -----------------------------------------------------------------------------------------------------------
  17     Method Drupal\general\Controller\GeneralController::build() has no return type specified.
         ✏️  GeneralController.php
  19     If condition is always false.
         ✏️  GeneralController.php
  25     Variable $path_alias in PHPDoc tag @var does not match assigned variable $my_node_alias.
         ✏️  GeneralController.php
  25     \Drupal calls should be avoided in classes, use dependency injection instead
         ✏️  GeneralController.php
  40     \Drupal calls should be avoided in classes, use dependency injection instead
         ✏️  GeneralController.php
  44     \Drupal calls should be avoided in classes, use dependency injection instead
         ✏️  GeneralController.php
  47     \Drupal calls should be avoided in classes, use dependency injection instead
         ✏️  GeneralController.php
If you run out of memory, try using a higher memory limit as documented at phpstan.org:
vendor/bin/phpstan.phar --memory-limit=256M or even vendor/bin/phpstan --memory-limit=1G
For more info:
- See Getting started with PHPStan on drupal.org updated October 2022
- Phil Norton's article Running PHPStan On Drupal Custom Modules - July 2022
- PHPStan documentation
- Watch Matt Glaman video from MidCamp 2024 - March 2024 and view the slides from the presentation
VS Code and Drupal
Some folks like to use Microsoft's Visual Studio Code as a free alternative to PHPStorm.
It has a number of plugins that can make it a powerful tool for Drupal development. Here are some of the plugins that you might find useful:
- PHP Intelephense - a high performance PHP language server packed full of features.
- PHP Debug - a VS Code extension to enable debugging of PHP scripts.
- PHP CS Fixer - a PHP coding standards fixer for Visual Studio Code.
- PHP DocBlocker - a simple, dependency free PHP specific DocBlocking package.
Mike Anello of Drupaleasy has a Youtube video from Midcamp explaining how to set up VS Code for Drupal Development - March 2024. The session description is:
Attendees of this session will leave with the knowledge necessary to configure their copy of Visual Studio Code as will be demonstrated in the session.
Learning objectives
Integrate phpcs, phpcbf, and PhpStan with Visual Studio Code Integrate Xdebug with Visual Studio Code Install and configure recommended Visual Studio Code extensions for Drupal development
Troubleshooting Xdebug with DDEV
- Use curl or a browser to create a web request. For example, curl https://d9.ddev.site
- If the IDE doesn't respond, take a look at ddev logs (
ddev logs). If you see a message like ""PHP message: Xdebug: [Step Debug] Could not connect to debugging client. Tried: host.docker.internal:9000 (through xdebug.client_host/xdebug.client_port)" then php/xdebug (inside the container) is not able to make a connection to port 9000. - In PhpStorm, disable the "listen for connections" button so it won't listen. Or just exit PhpStorm.
ddev sshinto the web container. Can you run telnet host.docker.internal 9000 and have it connect? If not, follow the instructions above about disabling firewall and adding an exception for port 9000.- In PhpStorm, disable the “listen for connections” button so it won’t listen. Or exit PhpStorm. With another IDE like VS Code, stop the debugger from listening.
ddev sshinto the web container. Can you runtelnet host.docker.internal 9000and have it connect? If so, you have something else running on port 9000. On the host, usesudo lsof -i :9000 -sTCP:LISTENto find out what’s there and stop it. Don’t continue debugging until your telnet command does not connect. (On Windows WSL2 you may have to look for listeners both inside WSL2 and on the Windows side.)- Now click the “listen” button on PhpStorm to start listening for connections.
ddev sshand try thetelnet host.docker.internal 9000again. It should connect. If not, maybe PhpStorm is not listening, or not configured to listen on port 9000?- Check to make sure that Xdebug is enabled. You can use
php -i | grep -i xdebuginside the container, or use any other technique you want that gives the output ofphpinfo(), including Drupal’sadmin/reports/status/php. You should see withXdebug v3andphp -i | grep xdebug.modeshould give youxdebug.mode => debug,develop => debug,develop. - Set a breakpoint in the first relevant line of your index.php and then visit the site in a browser. It should stop at that first line.
- If you’re using a flavor of IDE that connects directly into the web container like VS Code Language Server, you may want to use the global
xdebug_ide_locationsetting to explain to DDEV the situation. For example,ddev config global --xdebug-ide-location=container, which tells the PHP/Xdebug to connect directly to the listener inside the container. - To find out what DDEV is using for the value of
host.docker.internalyou can runDDEV_DEBUG=true ddev startand it will explain how it’s getting that value, which help troubleshoot some problems. You’ll see something likehost.docker.internal=192.168.5.2when running on Colima which can explain the usage.
For more, check out Troubleshooting Xdebug on DDEV docs
What is listening on port 9000?
To check if something is listening on port 9000 (the default port for xdebug) it's best to use lsof although there are a few other options:
lsof -i TCP:9000Here is the output from lsof -i TCP:9000 where it reports that PhpStorm is listening:
COMMAND    PID   USER   FD   TYPE             DEVICE SIZE/OFF NODE NAME
phpstorm 24380 selwyn  525u  IPv6 0xb7fc31a42f1fb36d      0t0  TCP *:cslistener (LISTEN)
Here lsof -i TCP:9000 reports that php-fpm is listening.
COMMAND PID USER FD TYPE DEVICE SIZE/OFF NODE NAME

php-fpm 732 selwyn 7u IPv4 0x4120ed57a07e871f 0t0 TCP
localhost:cslistener (LISTEN)

php-fpm 764 selwyn 8u IPv4 0x4120ed57a07e871f 0t0 TCP
localhost:cslistener (LISTEN)

php-fpm 765 selwyn 8u IPv4 0x4120ed57a07e871f 0t0 TCP
localhost:cslistener (LISTEN)
You can also try netstat or nc both of which are slightly less informative:
Here is the output from netstat -an | grep 9000 indicating something is listening on port 9000:
tcp46 0 0 *.9000 *.* LISTENAnd from the nc -z localhost 9000 command showing something is listening on port 9000:
Connection to localhost port 9000 [tcp/cslistener] succeeded!Create your settings.local.php
1. Copy, rename, and move the sites/example.settings.local.php to sites/default/settings.local.php:
$ cp sites/example.settings.local.php sites/default/settings.local.php
2. Open sites/default/settings.php and uncomment these lines:
if (file_exists($app_root . '/' . $site_path . '/settings.local.php')) {
  include $app_root . '/' . $site_path . '/settings.local.php';
}
This will include the local settings file as part of Drupal's settings file.
3. Open settings.local.php and make sure development.services.yml is enabled.
$settings['container_yamls'][] = DRUPAL_ROOT . '/sites/development.services.yml';By default development.services.yml contains the settings to disable Drupal caching:
services:
  cache.backend.null:
    class: Drupal\Core\Cache\NullBackendFactory
TIP
Do not create development.services.yml, it exists under /sites
4. In settings.local.php change the following to be TRUE if you want to work with enabled css- and js-aggregation:
$config['system.performance']['css']['preprocess'] = FALSE;
$config['system.performance']['js']['preprocess'] = FALSE;
5. Uncomment these lines in settings.local.php to disable the render cache and disable dynamic page cache:
$settings['cache']['bins']['render'] = 'cache.backend.null';
$settings['cache']['bins']['dynamic_page_cache'] = 'cache.backend.null';
Add the following lines to your sites/default/settings.local.php
$settings['cache']['bins']['page'] = 'cache.backend.null';If you do not want to install test modules and themes, set the following to FALSE:
$settings['extension_discovery_scan_tests'] = FALSE;6. Open sites/development.services.yml in the sites folder and add the following block to disable the twig cache and enable twig debugging:
parameters:
  twig.config:
    debug: true
    auto_reload: true
    cache: false
If the parameters section is already present in the development.services.yml file, append the twig.config section to it.
Note
The new way to enable Twig debugging is via the user interface. In the menus select Configuration, Development, Development Settings (or navigate to /admin/config/development/settings) and check the Twig development mode box, then check the boxes for Twig debug mode and disable Twig cache. You can also check the Do not cache markup at this time.
7. Rebuild the Drupal cache (ddev drush cr) otherwise your website will encounter an unexpected error on page reload.
Refer to this article: Disable Drupal (>=8.0) caching during development on drupal.org - updated May 2023
Also read https://www.drupaleasy.com/blogs/ultimike/2024/02/why-you-should-care-about-using-settingslocalphp
Development.services.yml
Recommended setup for development is to have this file in sites/default/development.services.yml.
# Local development services.
#
# To activate this feature, follow the instructions at the top of the
# 'example.settings.local.php' file, which sits next to this file.
parameters:
  http.response.debug_cacheability_headers: true
  twig.config:
    # Twig debugging:
    #
    # When debugging is enabled:
    # - The markup of each Twig template is surrounded by HTML comments that
    #   contain theming information, such as template file name suggestions.
    # - Note that this debugging markup will cause automated tests that directly
    #   check rendered HTML to fail. When running automated tests, 'debug'
    #   should be set to FALSE.
    # - The dump() function can be used in Twig templates to output information
    #   about template variables.
    # - Twig templates are automatically recompiled whenever the source code
    #   changes (see auto_reload below).
    #
    # For more information about debugging Twig templates, see
    # https://www.drupal.org/node/1906392.
    #
    # Not recommended in production environments
    # @default false
    debug: true
    # Twig auto-reload:
    #
    # Automatically recompile Twig templates whenever the source code changes.
    # If you don't provide a value for auto_reload, it will be determined
    # based on the value of debug.
    #
    # Not recommended in production environments
    # @default null
    #    auto_reload: null
    auto_reload: true
    # Twig cache:
    #
    # By default, Twig templates will be compiled and stored in the filesystem
    # to increase performance. Disabling the Twig cache will recompile the
    # templates from source each time they are used. In most cases the
    # auto_reload setting above should be enabled rather than disabling the
    # Twig cache.
    #
    # Not recommended in production environments
    # @default true
    cache: false
services:
  cache.backend.null:
    class: Drupal\Core\Cache\NullBackendFactory
Make sure the following is in docroot/sites/default/settings.local.php.
/**
 * Enable local development services.
 */
$settings['container_yamls'][] = DRUPAL_ROOT . '/sites/development.services.yml';
Enable twig debugging output in source
Note
The new way to enable Twig debugging is via the user interface. In the menus select Configuration, Development, Development Settings (or navigate to /admin/config/development/settings) and check the Twig development mode box, then check the boxes for Twig debug mode and disable Twig cache. You can also check the Do not cache markup at this time.
In sites/default/development.services.yml set twig.config debug:true. See core.services.yml for lots of other items to change for development
# Local development services.
#
parameters:
  http.response.debug_cacheability_headers: true
  twig.config:
    debug: true
    auto_reload: true
    cache: false

# To disable caching, you need this and a few other items
services:
  cache.backend.null:
    class: Drupal\Core\Cache\NullBackendFactory
to enable put the following in settings.local.php:
/**
 * Enable local development services.
 */
$settings['container_yamls'][] = DRUPAL_ROOT . '/sites/development.services.yml';
You also need to disable the render cache in settings.local.php with:
$settings['cache']['bins']['render'] = 'cache.backend.null';Kint
Kint for PHP is a tool designed to present your debugging data in the absolutely best way possible. In other words, it’s var_dump() and debug_backtrace() on steroids. Easy to use, but powerful and customizable. An essential addition to your development toolbox.
Here is a detailed tutorial on how to print variables using Devel and Kint in Drupal - February 2022.
Setup
We need both the the Devel and the Devel Kint Extras modules. Devel Kint Extras ships with the kint-php library which will be automatically installed if you install Devel Kint Extras using Composer:
$ composer require drupal/devel drupal/devel_kint_extrasEnable both with the following Drush command:
$ drush en devel_kint_extras -yFinally, enable Kint Extended as the Variables Dumper. To do this go to admin/config/development/devel and select Kint Extender and Save the configuration.
Note
These plugins can cause out-of-memory errors. So, to make sure you don't run into these when using this module, make sure to add the following snippet to your settings.local.php:
if (class_exists('Kint')) {
  // Change the maximum depth to prevent out-of-memory errors for Kint ver 5.
  \Kint::$max_depth = 4;
}
In Kint 4 this setting was renamed, so if you're using that version use the following snippet:
if (class_exists('Kint')) {
  // Change the maximum depth to prevent out-of-memory errors for Kint ver 4.
  \Kint::$depth_limit= 4;
}
Add kint to a custom module
function custom_kint_preprocess_page(&$variables) {
  kint($variables['page']);
 }
Dump variables in a TWIG template
{{ kint(attributes) }}Kint::dump
From Migrate Devel contrib module, in /docroot/modules/contrib/migrate_devel/src/EventSubscriber/MigrationEventSubscriber.php.
This is used in migrate to dump the source and destination values.
// We use kint directly here since we want to support variable naming.
kint_require();
\Kint::dump($Source, $Destination, $DestinationIDValues);
Set max levels to avoid running out of memory
This keeps your system from slowing down and running out of memory when using Kint.
Add this to settings.local.php
// Change kint maxLevels setting:
//include_once(DRUPAL_ROOT . '/modules/contrib/devel/kint/kint/Kint.class.php');
if (class_exists('Kint')) {
  // Change the maximum depth to prevent out-of-memory errors for Kint ver 5.
  \Kint::$max_depth = 4;
}
Replacing deprecated functions
If you need to find a deprecated function, you can search for it (in the keywords field) at the Change Records on drupal.org to find out how to replace it with a current function. For example, when searching for taxonomy_get_tree the site suggests:
 // Procedural code - for OO code, inject the TermStorage object.
  $tree = \Drupal::entityTypeManager()->getStorage('taxonomy_term')->loadTree($vid, $parent, $max_depth, $load_entities);
It also suggests:
TermStorageInterface::loadTree() now returns an array of all term objects in the tree. Each term object is extended to have "depth" and "parents" attributes in addition to its normal ones (aka the original return of taxonomy_get_tree()).
More on stackexchange
Missing module
If you see a PHP warning such as The following module is missing from the file system... (or similar) on your site, Here are some ways to remove it:
A quick solution is to run drush cedit core.extension - you can then delete the line containing the unwanted module.
Note
Run drush cr first to try to get things sane. This opens the config in vim so you can use /tracer to search for tracer, dd to delete a line, :wq to save Also if this fails, just try it again. Sometimes, it fails with a message like:
  The command "${VISUAL-${EDITOR-vi}} /tmp/drush_tmp_1711122194_65fda712e42d6/core.extension.yml" failed.
  Exit Code: 1(General error)
  Working directory: /Users/selwyn/Sites/ddev101/web

  Output:
  ================
  Error Output:
  ================
Also check out Manually removing a missing module
If this doesn't work for you, try the following query:
$ drush sql-query "DELETE FROM key_value WHERE name='module_name';"More at How to fix "The following module is missing from the file system..." warning messages on Drupal.org
You have requested a non-existent service
Symfony\Component\DependencyInjection\Exception\ServiceNotFoundException: You have requested a non-existent service "lingotek.content_translation". in /var/www/vendor/symfony/dependency-injection/ContainerBuilder.php on line 1063 #0Sometimes, when drush cr throws errors like that try drush sqlc and then truncate cache_bootstrap and truncate cache_discovery.
Generating Test Content with Devel Generate
When building a Drupal website, it is useful to populate the site with enough content to check the overall displays when using layouts, views and design. It becomes important to test the website out with dummy content before adding live content. Instead of manually typing or importing data, the Devel module allows you to create dummy content automatically.
More at:
- Working with the devel module in Drupal 9 to generate dummy content by Karishma Amin - August 2023
- Generating dummy Drupal content with Devel & more - October 2021
Enable verbose display of warning and error messages
In settings.local.php (orsettings.php or settings.ddev.php) set the following config:
// Enable verbose logging for errors.
// https://www.drupal.org/forum/support/post-installation/2018-07-18/enable-drupal-8-backend-errorlogdebugging-mode
$config['system.logging']['error_level'] = 'verbose';
The options are:
hide: No errors or warningssome: Errors and warningsall: All messagesverbose: All messages, with backtrace information
See Enable verbose error logging for better backtracing and debugging - Updated April 2023
Resources
- Composer best practices for Drupal 8 from Lullabot - Jan 2018
- Why DDEV by Randy Fay (Author of DDEV) - Dec 2022
- How to setup Devel and Kint on Drupal 9 by Alex - Aug 2021
- Enable verbose error logging for better backtracing and debugging - April 2023
- How to implement Drupal Coding standards at drupalize.me
- Running PHPStan On Drupal Custom Modules - July 2022
- The Ultimate Guide to drupal/core-* packages - May 2022
- DDEV performance especially around Mutagen on MacOS - Mar 2024
- DDEV CMS Quickstart guides - January 2024
- Why you should care about using settings.local.php - February 2024
- Troubleshooting Xdebug on DDEV docs
- Step debugging with Xdebug on DDEV docs
- Mix module for development